Friday, 13 April 2018

The Water Gates


The Water Gates

My Blogs are like buses, you wait ages for one and then two turn up together. As promised in my last blog here is more detail of the installation of the lock gates at Bacton Wood.
On a cold sunny day in February 2017 the lower gates for the lock at Bacton Wood were lifted into place.
Dog walkers and ramblers watched as the enormous structures were lifted into position in the entrance to the lock. But none of the spectators were aware of the effort it had taken to arrive at this final part of the project.

2nd gate being lifted into position
Work had started on the gates in August 2016. The material of choice was
 Greenheart  timber.   A close grained timber from South America weighing in at around seventy pounds per cubic foot.  
Greenheart is so dense it will not float. The major advantage of Greenheart is it’s resistance to most water-bourne parasites that attack and destroy softer timbers.
Contructing the two gates would require a total of twenty Mortise and Tennon joints cut into the timber frames. Because of the density of the timber, completing three or four  Mortise joints in a day was considered good going. Splinters from Greenheart timber, commonly turn septic due to toxins contained in this most durable of hard woods. 
Greenheart splinters commonly turn septic.
Because each upright weighs over half a ton, a hydraulic lift was essential to manoeuvre them into position. The next task was to cut twenty tennons into the lighter cross members.
These weighed a mere quarter of a ton each.

Completed tennons
 When all the joints had been completed the gates were laid out on the workshop floor. 
Then each one in turn was checked by dry fitting them.  Some were a perfect fit – while others needed some fine adjustment. 
Cargo straps were used to draw the components together and a pinch bar used to part them.
Dry fitting the joints.
Cargo straps used to close the components.
A pinch bar parting the joints.
As well as aligning all the timber components, tie irons also had to be fitted before the gate could be assembled. Each joint was cleaned out with an airline. Then all the cross members and tie irons were aligned ready for the final assembly.

A waterproof, polyurethane adhesive was applied to each joint. 

Applying the adhesive.

Once applied the glue would set within thirty minutes.  Just thirty minutes to align and close all the joints with no second chance.  Any mistakes or delays at this stage would have been disastrous. The physical effort needed to hastily draw all the joints together before the adhesive began to set was  a really tough session.
Drawing all the joints together-a tough session.
January 22nd 2017 dawned cold and frosty. 
A group of Trust volunteers had assembled to plank the gates.  Tannalised Pine was cut to length and laid into position on the gates.
When the planks were in place one hundred pilot holes were drilled through the pine into the frame below.
Drilling pilot holes into the frames.
 The planks were then removed and stacked in order,while the pilot holes were drilled out to a suitable depth in the frame.  
Replacing the planks.

This done, the planks were carefully replaced in the exact position from where they had been removed.  When all the drilled holes were perfectly aligned, the planks were glued into position and screwed down. 

Screwing down the planks.
Constructing the gates was only part of the project.  A means to transport them had to be found.  This was achieved by modifying the brute of an old farm trailer.
 
On the coldest winter’s day of 2017, the volunteers set about converting the trailer.
The conversion was a fairly low tech affair.  In spite of  the trailer’s short comings  it was perfect for the job.  What it lacked in style and elegance was more than compensated for in strength.
Converting the trailer.
The gates weighing almost four tons each were lifted onto the trailer and transported from the yard to the canal. 

Transporting the gates to the lock.
Saturday February 18th.
To lower the water level in the lock chamber a battery of pumps had been running every day for almost a week.

Pumping out the lock chamber.
Intrepid volunteers donned their wellington boots, armed themselves with shovels and ventured into the lock chamber to remove the mud and silt that the pumps couldn’t clear. 
The sludge was loaded into the JCB bucket and lifted out of the chamber.

Volunteers removing the silt from the lock chamber.
When operational, the bottom edge of the gates would traverse over a recess in the floor  of the lock. But the gates could not be lifted into place until the recess had been cleared of water and silt. 
 
The project was falling behind schedule.

Clearing the recess was taking longer than planned and the project was falling well behind schedule.
Eventually by late afternoon the first gate was lifted into position and secured against the lock. 

Sunday February 19th. 
The pumps had been shut down overnight resulting in the water level rising by about two feet in the lock chamber.  Before the second lift could go ahead the water would have to be pumped out.

The recess in the floor of the lock had become submerged again.  So the “bucket and chuck it” brigade was called into action yet again.

By midday the second lift was ready.  
Like clockwork the massive gate was lifted, turned, and lowered into the lock.

Second gate lifted into position.
Good for the next hundred years, the gates will stand as a monument to the folks who built and erected them. 

New gates installed.

A Film of the project can be seen at the Atrium Theatre, Spenser Avenue, North Walsham.
April 24th 2018 as part of the "Canal Film Night".

Monday, 2 April 2018

The Cameras Never Stopped Rolling.

It has been some time since my last blog, this is due to a really heavy workload of filming.   It is not only the blog that has been neglected, there are a hundred and one jobs that need to be finished at home and the car is begging for some TLC.   But the cameras never stopped rolling!

Over the last few months a great deal of my time has been spent on the North Walsham and Dilham canal. The progress on the waterway has been nothing short of astounding.  Since my last blog in June 2016 two of the spillways have been restored and the lower gates at Bacton Wood lock have been manufactured and installed.   Each gate weighs a little over four tons and is built to tolerance of a few millimetres, quite an achievement in itself.

Gates being manufactured

Gates being lifted into position
The gate project took nine months from manufacture to installation.   There are still outstanding tasks to be completed before the gates are in full working order.   But more of this later.

Restoring the Ebridge spillway was another major project running through the summer of 2017.  The spillway was completely over- grown until it was re-discovered in 2005.  This work has had to wait twelve years until The Old Canal Company and the NW&D canal volunteers were able to begin the restoration work.   For two weeks in August the Waterways Recovery Group set up a summer camp to assist with the project. The recovery group travel all over the country to work on canals. 
The entire project took four months to complete.

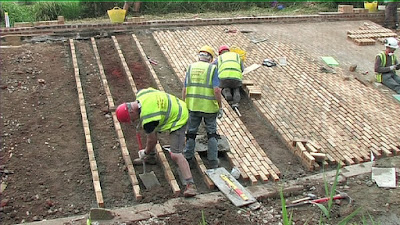
Trust volunteers installing the spillway timber frames
Waterways Recovery Group laying bricks

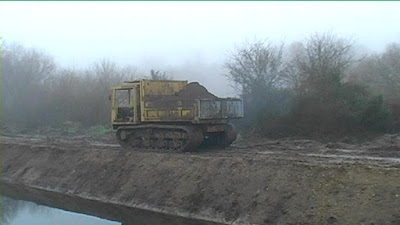
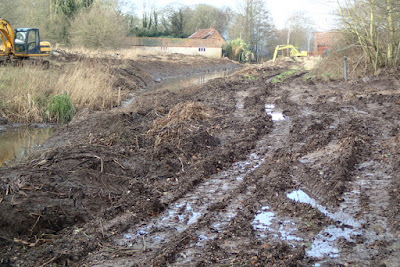
Over the last twelve months literally thousands of tons of sub soil have been tipped along a two mile stretch of the canal to consolidate the banks.  Some of this essential work was concentrated on the dry section between Royston bridge and Pigney's wood.  
In spite of the wettest December for years, which produced the most appalling working conditions, the banks were completed in time for a visit from BBC TV.  The crew recorded the re-watering event giving the canal some very welcome publicity.

A dumper with a load of subsoil
The JCB consolidating the bank at Pigney's wood..
Films of all three projects are being shown at the Atrium theatre.
Spencer Avenue, North Walsham. 7.00pm. April 24th 2018. 
Every body welcome!

In my next blog I intend to re-visit these projects in more detail.


Friday, 3 June 2016

A Mast For "Albion"

Filming four tons of Columbian Pine being laminated and fashioned into a mast for the Wherry "Albion" has been a fascinating project.  "Albion's" previous mast was manufactured in 2002 so it is highly unlikely I will ever film a similar event.

Columbian Pine, grown in Scotland, was selected for the mast and milled by Summerscales Ltd of Grimsby.  At the mill the timber was cut into three inch thick planks and shipped to Eastwood Whelpton's yard at Upton, Norfolk in 2012.  Here the timber was left to dry and season in an open ended shed until September 2015.
Photo courtesy Roger Watts NWT.
Laminating the timber gives added strength and flexibility to the finished mast.  In the old days the boat- builder, or carpenter, would go to a plantation and select a suitable "Pitch Pine".  From it they would fashion the mast in one piece.  It was not uncommon for these old masts to break under stress. 
At Upton the roof of the shed that housed the overhead hoists had been been reinforced with upright timbers in order to support the fifty feet of bulk timber with an estimated weight of four tons.  

Timber batons were fitted between each length of planking to allow a generous coating of resin glue to be applied.   A team of four boat builders armed with lamb's wool rollers covered the upper and lower surfaces of each and every plank, under the watchful eye of Maynard Watson..

Photo courtesy Ian Scowen NWT

When every inch of the timber had been treated with resin glue each layer of laminate was raised with the hoist, allowing the spacing batons to be removed with the use of crowbars. The planks were lowered and clamped when all the spacers had been discarded.

Photo courtesy Ian Scowen NWT

Twenty six ratchet, tension straps were deployed along the length of the mast and tightened to within an inch of their lives.  To attain maximum tension the boat builders worked in pairs straining every sinew until their knuckles turned white and the resin glue oozed from between the planks.


Photo courtesy Ian Scowen NWT

When all the tension straps were firmly in place metal clamps were used to align the planks vertically while the resin was still malleable. The structure was left over a complete weekend to allow the resin glue to set and complete the first phase of the project.
Photo courtesy Ian Scowen NWT

After a few days the resin glue had cured sufficiently to allow the process to continue. The next phase of the  project was to square the timber structure into four equally flat sides. Using hand held circular saws, a series of cross cuts were made every two or three inches along the entire length of the mast.  These cuts were removed with hammer and chisel and finally planed smooth. The floor of the shed shuddered with a resounding thud each time the mast was turned to present a different face. 
 
Photo courtesy Ian Scowen NWT

When the mast had been squared attention was turned to the peak. A chain saw was used to shape the top of the mast after establishing the diameter and angle of taper.  The resin had set as hard as steel and the cutting blades of the chain saw quickly lost there edge.

Photo courtesy Ian Scowen NWT
Sawdust hung in the air as the whine of Electric planes echoed off the walls around the shed. After ten days the mast was gradually beginning to take shape.

Photo courtesy Ian Scowen NWT

The chainsaw was used to make a third and fourth angled cut to the peak of the mast. After several hours of planing the shape and the symmetry of the mast began to emerge.

Photo courtesy Ian Scowen NWT

The next phase of the project was to transform the four sides into eight sides forming an octagon. These eight sides would eventually be rounded off to form the finished mast. To square the timber the diameter of the mast had already been marked with a compass on each of the four sides. Using these same indicators a sliding bevel created cutting lines that would guide the saws to form the octagon.

Photo courtesy Ian Scowen NWT

The mast was hoisted and wedged at an angle to allow the chain saw to cut the bevel along the length of the mast. The foot retained four sides where the counter weight would be fitted.

Photo courtesy Ian Scowen NWT

The foot of the mast was flared to form a hip and then smoothed with an abrasive wheel.  Comparing the modern electric tools with the hand tools of a hundred years ago one can only marvel at the skill and energy required by those old time boat builders. 

Photo courtesy Ian Scowen NWT

The mast had to be turned and wedged in order to cut each of the four bevels which in their turn were planed smooth.  For several hours the plane followed the chainsaw along each bevel until the mast was a perfect octagon.

Photo courtesy Ian Scowen NWT

The whole structure was now somewhat slimmer and lighter than three weeks earlier and looking much more like a mast.  Although good progress was being maintained there was a still a great deal of precision work to be done before the mast was complete.

Photo courtesy Ian Scowen NWT

The body of the mast was now octagon shaped with the foot flared into a square. 

Photo courtesy Ian Scowen NWT
At the peak of the mast a step was formed for the crane iron.

Photo courtesy Ian Scowen NWT
The next task was to cut the Herring hole into the mast head.

Photo courtesy Ian Scowen NWT
All the fittings had been carefully removed from the old mast ready to be transferred to the one in production.  The crane iron was the first piece of hardware to be fitted.

Photo courtesy Ian Scowen NWT

The the main body of the mast was carefully rounded off.

Photo courtesy Ian Scowen NWT

At the foot of the mast the trunnion was was fitted and the counter weight prepared for mounting to the heel. The bottom of the mast was shaped to replicate the profile of the counter weight.

Photo courtesy Ian Scowen NWT

The extra long retaining bolts passed right through the body of counter weight and tightened. Although there was still work to be done the mast was all but ready.

Photo courtesy Ian Scowen NWT

Autumn had arrived and winter was fast approaching when the mast was removed from the shed and put into storage until the spring.  On March 30th 2016 "Albion" arrived at Upton and the mast was loaded.  A series of checks and function tests were carried out before "Albion" left with her new mast.


Monday, 28 March 2016

North Walsham and Dilham Canal Part 2.

It saddens me to see Norfolk slowly giving up more of her woodland and pasture in return for more tarmac roads and numerous housing developments.  No one can halt the onward march of progress as the demand for houses and urban development increases unabated. Everybody needs somewhere to live and bring up their children but how much longer can we sustain our rapidly growing population.

As we hurtle headlong into an uncertain future leaving the natural world behind us in a thick cloud of pollution, we seem to have forgotten that we are only caretakers that have been entrusted with our little corner of England. As the county of my birth slowly disappears before my eyes I am driven to record as much of it as possible before it is gone forever.

In this seemingly endless period of change there is one bright spot.  The North Walsham and Dilham canal.  The canal is being restored as close to its original condition as possible.
I began filming the restoration work carried out by the Old Canal Company and the North Walsham and Dilham Canal Trust six years ago.  In this time the progress has been nothing short of astounding.

The North Walsham and Dilham was opened in 1826, after an act of parliament was passed.  But  it fell into rapid decline after the last trading wherry left in 1934.  The development of the railway and road transport sounded the death knell for the waterway.  However, the canal is still officially a navigable waterway.

In the last twelve months alone the progress has been remarkable.  Last summer (2015) the section between the lock and the bridge at Bacton Wood has been restored. It took from April to August to remove the trees that had colonised the banks and the vegetation that had choked the channel. Removing tree stumps and de-silting has transformed the area from an overgrown backwater into a tranquil waterway.
Spa Common facing Downstream


Spa Common facing Upstream

Throughout Autumn and Winter, in spite of a record rainfall the work has pushed on, driving all the way from Pigney's Wood to Swafield staithe.   Already, regular visitors to this freshly restored length of the canal include deer, Kingfishers and the Little Egret.

Pigney's Wood

In the Autumn the canal by Pigneys wood, overgrown with trees and brambles, was cleared and reclaimed.  Heavy rainfall throughout the winter did little to stop the momentum although it did make conditions for working very challenging.  I know this from my own experience, carrying forty five pounds of video equipment through several inches of mud to film the action.  

Challenging conditions on Paston Way

Along Paston Way to the old M&GN Railway bridge, the canal owners and volunteers pressed on with the restoration.  Clearing decades of ivy and vegetation that had covered the bridge piers and the footpath.

Old M&GN railway bridge.


Hauling Ivy and growth from the bridge.

At Swafield staithe a giant Bamboo plant was removed along with a number of trees that were growing in the canal bed.  After the vegetation had been cleared the banks between the staithe and the bridge were graded and profiled. 
 
The canal at Swafield Staithe.


Removing trees near Swafield bridge.

The owner of the canal assisted by the volunteers of the trust have worked in all weathers and conditions to restore this priceless example of our history.  There is still a great deal of work to be done and as more of the canal  is restored more and more routine maintenance is required. Reeds need cutting, banks need mowing.   Visitors to the canal cannot fail to be impressed by the progress to date, but very few realise just how much hard work and determination it has taken to get this far.

All the photographs in the blog are kindly supplied by Alan Bertram, a stalwart supporter and volunteer of the canal trust.  Use the links below to follow the news and progress of the canal.


http://www.nwdct.org/
https://www.facebook.com/NWDCT?fref=ts